Tuesday, February 19, 2013

Bread Upma

Upma is probably one of the easiest and quickest south-indian breakfast/dinner variety. One of my favorites,  bread upma, brings back childhood memories of my snack-time during evenings after school. Although it is an easy recipe, the bread being the star of the recipe needs to be the right pick. The chosen bread (any variety of your choice) shouldn't be too soft (makes it mushy) nor too firm (makes it hard to chew on). If you have soft bread, stick it in the refrigerator for couple days until it firms up a bit and then use it in the recipe.All you need is some bread (with the rest of the ingredients from your pantry) and you can have a simple dish in no time!!

Ingredients:

20-25 slices of bread (I used a mix of whole wheat & white bread), cut into small cubes (approx. 4-5 cups)
2 tomatoes, finely chopped
2 onions, finely chopped
2 tbsp urad dhal
2 tbsp channa dhal (optional)
2 tbsp mustard seeds
2-3 tsp chilli powder (adjust to taste)
1/2 tsp turmeric powder
1 tsp tamarind paste (adjust to taste)
Salt, to taste
6-7 tbsp oil
1/4 cup  fresh cilantro, finely chopped

Method:


Cut the bread slice into small cubes and set aside.


In a pan, heat oil, add mustard seeds, urad dhal, channa dhal and curry leaves. 


Once the mustard seeds splutter, add onions and little salt (to cook the onions faster). Sauté the onions until they turn slightly soft. 


Add tomatoes and fry well till it gets pulpy. Add turmeric powder, chilli powder and salt. Stir well.


Add tamarind paste (or lemon juice before adding cilantro) and 1/4-1/2 cup water and cook until the raw smell fades away.


 Add bread cubes and toss well. 


Add chopped cilantro and mix well. 


Serve hot.

For a variation, you can add some mixed veggies or boiled potato and make it more wholesome.


Makes 4-5 servings.

Tuesday, February 12, 2013

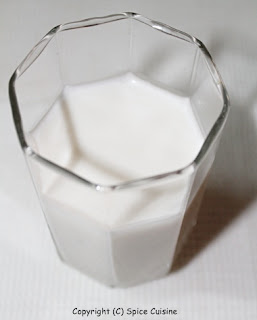
Homemade Almond Milk

Almond milk is a popular substitute for dairy milk that has two simple ingredients - almonds and water. It is free of soy, cholesterol and lactose. After being used to buying almond milk from stores, I decided to make it at home (more so, out of desperation, as it is not commonly available in India). Almond milk can be prepared in plain, vanilla or chocolate flavors. I prefer the original unsweetened version as it works best in any recipe as well as in my daily cup of masala chai. The almond milk can be prepared in thick/creamy or slightly thinner consistency to suit your taste.

Ingredients:

1 cup almonds, with skin (preferably soaked overnight or at least for 8-10 hours)
3-4 cups filtered water 
Pinch of salt, optional
Sweetener of choice (maple syrup/agave nectar/date syrup), optional
Flavoring of choice (cocoa powder/vanilla extract), optional

Method:


Soak the almonds in water overnight.  Drain the water from the almonds.


In a blender, add the soaked almonds, 2 cups of water, pinch of salt, sweetener and flavoring. Blend it for 1-2 minutes until it turns into a smooth paste. 


Add the remaining 2 cups of water and blend for another 2-3 minutes till it turns frothy (if you don’t have a big blender like me, you can grind them in 2 batches with half the quantity of nuts and water in each batch).


Place a thick layer of cheesecloth over a big bowl and pour the almond milk through the cheesecloth and strain it. Squeeze the cheesecloth to get all the liquid out (you don’t want to waste any of the milk, do you??).


Enjoy nutritious homemade almond milk with your favorite cereal or a cup of tea/coffee or in baking too. Don’t discard the almond meal inside the cheesecloth. Dry out the almond meal (air dry or stick it in the oven on low temp) and use it in baking, or in soups/gravies as a thickener.


Store the almond milk in the refrigerator and use within 3-4 days.

Note: For thicker milk, use 3 cups water and for lighter milk, use 4 cups water. I used 4 cups of water to make almond milk as I prefer a thinner consistency but 3 ½ cups would be a desirable consistency.

Makes 4 cups.

Sunday, February 10, 2013

Unni Appam

Unni Appam originates from Kerala which is located in the south-west region of India. In malayalam (language spoken by keralites), 'unni' means small and 'appam' means rice cake (similar to Aebleskiver of danish origin). Unni appam is fluffy round rice cakes made using rice, plantain, jaggery (unrefined whole cane sugar) and ghee (clarified butter) along with optional ingredients like cardamom powder, coconut pieces or cashewnuts. The traditional unni appam uses only rice flour but I like to use a blend of whole wheat flour, all-purpose flour and rice flour. It is mildly sweet treat that satisfies your sweet cravings.

Ingredients:

1 cup whole wheat flour
1 cup all purpose flour
1/2 cup rice flour
1 cup jaggery (adjust to taste)
1 - 1 1/2 cup water
3-4 medium overripe bananas
1/2 tsp cardamom powder, optional
1/8 tsp baking soda, optional
Pinch of salt

Method:


In a large bowl, add whole wheat flour, all purpose flour, rice flour( if only using rice flour, add 2 cups rice flour with 1/2 cup whole wheat flour or all-purpose flour), baking soda and salt. Mix well. 

In a pan, on medium heat, add powdered jaggery and 1 cup water. Heat until completely melted. Filter out the impurities.  Pour this syrup into the dry mix. 

Add the bananas and mash them until they blend well with the batter. If required, add warm or hot water to the batter until you  get the desired consistency (should be slightly thicker than idli/dosa batter). Add cardamom powder and mix well.


If you choose to use coconut pieces and cashewnuts, fry them in 1-2 tsp vegan butter until golden brown and then add to the batter. 

Set the batter aside for 1-2 hours for best results but if you are impatient like me, go ahead and start making them right away.


Heat the cast-iron or non-stick mold pan (appam pan) and grease the molds with oil and spoon the batter into each mold. Cook for 2-3 mins until the appam turns golden brown. Flip to the other side using a spoon or skewer till it cooks until golden brown color. 


Drain the excess oil on paper towel and repeat the procedure for the remaining batter. Serve warm and enjoy!!


The appams can be stored in the refrigerator for 2-3 days after they completely cool down. Microwave for 10-20 seconds before consuming.

Makes 35-40 appams.

Saturday, February 2, 2013

Roasted Arvi

It feels like it has been such a long time since I last blogged. Every now and then, all of us go through a phase where your body tends to shut down for a while.Well, this was my moment!! After a long journey across the globe to get home to visit my family (only to realize what a nightmare my entire journey was!!), especially with the baby (although, it did get better during the last leg of the journey), was bit of a challenge as well as tiring. I really wonder how moms do it all the time?? Normally, I don't go through much of a jet lag, although the little one took her own sweet time to get over her jet lag and so, ended up sleeping with her at odd hours. It does feel good to get your mind and body refreshed and enjoy a short break.

Anyway, coming to the recipe, Arvi (also known as Colocasia/Taro) is one among my favorites from mom's cooking. Taro is a root vegetable that is popular in India. It is mostly prepared as a dry roast and served as a side dish but sometimes it is used in gravies too. This is probably one of the easiest recipes that you can make, especially, if you use frozen arvi. Don't be fooled by the basic ingredients, trust me, this dish is simple yet tasty (better than dry roasted potatoes).

Ingredients:

1 lb Arvi/taro, boiled, peeled and each cut into half
10-12 cloves garlic, crushed
2-3 tbsp oil
1 tsp mustard seeds
1 1/2 tsp  urad dhal
1/4 tsp turmeric powder
1 1/2 - 2 tsp red chilli powder (adjust to taste)
1/2 - 1 tsp tamarind paste (adjust to taste)
Few curry leaves
Salt, to taste

Method:
  

Rinse and soak arvi in water for 15-20 mins.


Boil the arvi until it is semi-soft or 3/4th done. Drain water and remove the skin. Cut each arvi into half and set aside (it is a bit sticky and messy, don't say I didn't warn you. Instead, you can use frozen arvi to make things easier).


In a pan, on medium flame, heat oil and add mustard seeds, urad dhal, crushed garlic, and curry leaves. After the mustard seeds splutter, add the arvi and sauté for 4-5 mins.


Allow it to fry about half way through, then add turmeric powder, chilli powder and salt. Reduce to low flame. After 5-6 mins, add 1/2-3/4 tsp tamarind paste and toss well. 


Sauté until the arvi gets roasted well (on low flame, it takes about 20 mins or so). Serve hot as a side dish for rice.


Makes 4-5 servings.